
Importing Geographic Information Systems (GIS) data in Google Earth Desktop
Tutorial Contents
-
Prerequisites
-
Let's Get Started!
-
Import a GIS shapefile, or other vector dataset
-
Import GeoTIFF, or other raster dataset
-
Discussion and Feedback
-
What's Next
Prerequisites
Absolutely no programming skills needed!
In April 2017, Google Earth on Web was released, which puts Earth in the browser. However, for this tutorial, you will need Google Earth Pro for Desktop installed on your computer. Download the latest version here.
Let's Get Started!
Open Google Earth Pro.
Download the following datasets for use in this exercise: Rivers_in_SEAsia_shapefile.zip and LandCover_in_SEAsia_grid.zip to your computer. Unzip both files into a folder on your computer.
Import a GIS shapefile, or other vector dataset
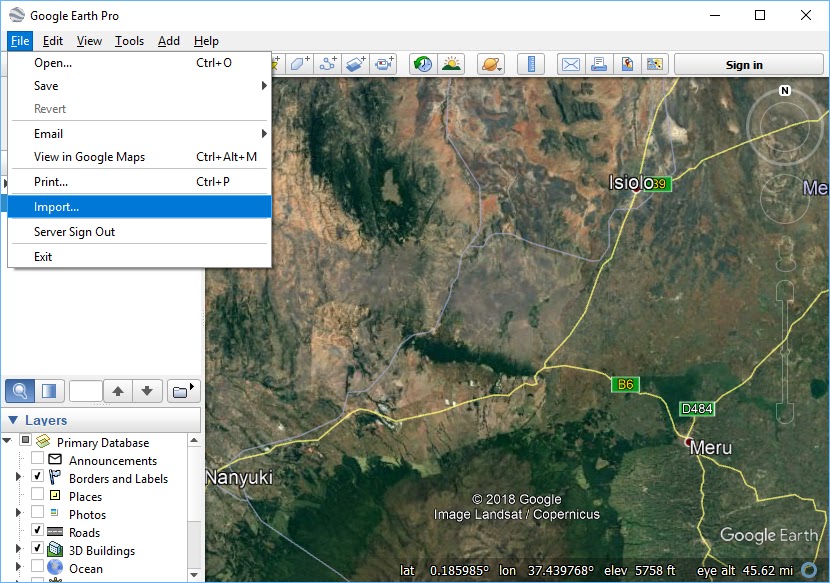
Select Import... from the File menu.
Select your data's file type from the Files of type menu. For this example, choose _ESRI Shape (.shp)_ from the file type menu, select Rivers_in_Southeast_Asia.shp, and click Open*.
If you have MapInfo .tab data, choose _MapInfo (.tab) from the _Files of type menu, select your TAB file and click Open*.
A message will appear, stating that the file contains more than 2500 features and could cause application performance degradation.
When you see this message, you can choose to import just a sample, restrict to your current view, or import all.
Click the Import all button.
A message will appear, asking if you would like to create a Style Template. Click Yes.
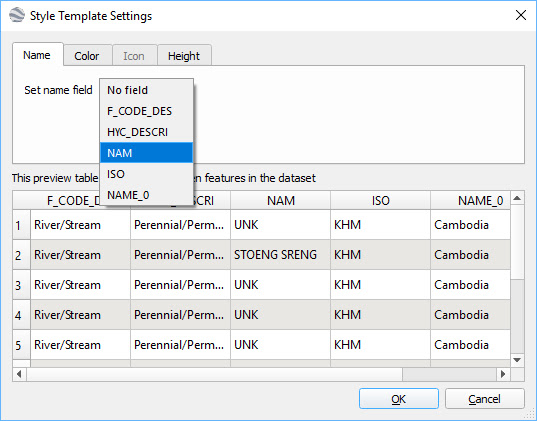
In the next Style Template Settings dialog box, you will create a style template for the rivers, which will include colors, labels, and icons.
Under the Name tab, choose the field in the shapefile that you would like to use for the name labels for the data in Google Earth. You can use the preview table to view which field contains the content you would like to use for the labels.
For this example, select “NAM” in the drop-down menu. This is the field in the shapefile that contains the names of the rivers.
Under the Color tab, select to Use single color, and click on the color swatch to the right. This causes the color settings to appear.
In the Select Color dialog box, choose a color for the river dataset. For this example, select a blue color, and click OK.
Under the Height tab, keep Clamp features to ground selected. This will keep the rivers clamped to the ground, following the terrain.
Click OK to finish your style.
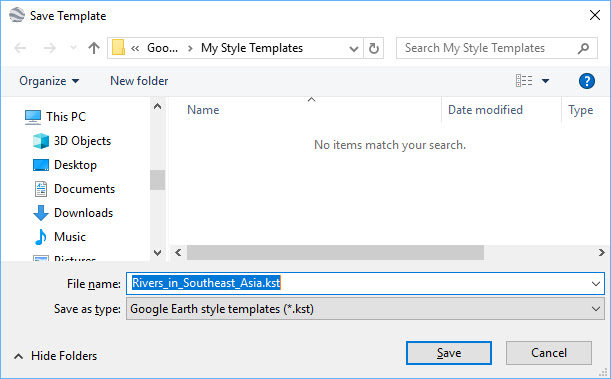
A dialog box will appear, asking if you would like to save the style template you just created. If you wish to save it for future use, click Save. Otherwise, click Cancel. For this example, click Save.
Your GIS data has been converted to KML, and the data now appears in Google Earth. Notice how the KML is also listed in the Places panel under your Temporary Places folder. To save it in Google Earth for future sessions, select and drag this file to your My Places folder before closing Google Earth.
Once you have imported your vector dataset, you can optimize your file to limit the number of points displayed at higher altitudes, by using the Regionate tool, and following these steps:
- Save your imported vector dataset as a KML, then choose Regionate under the Tools menu.
- For the Input file, browse for your saved KML file. Then choose an Output folder where you want to save the regionated files.
- Check “Open regionated files when done” and click Regionate. Now, as you zoom in, you'll see increasingly more points.


Import GeoTIFF, or other raster dataset
To import a raster dataset, select Import... from the File menu. Select the appropriate file format from the file type menu at the bottom, select the file you want to import, and click Open. For this example, select file type _GeoTIFF (.tif)_, select the LandCover_SEAsia.tif file, and click Open*.
If your imported image is larger than the maximum size supported by the hardware, you will be given several choices:
- Click Create Super Overlay... to import large images and have them automatically split into tiles and scaled according to your zoom level.
- Click Scale to rescale to the maximum size supported.
- Click Crop to view only a full resolution subset of the image.
For this tutorial, choose Scale to import a single, slightly lower resolution image.
In the New Image Overlay dialog box that appears, give your image overlay a name, and then click OK.
Because the raster dataset in georeferenced to a coordinate system, it is automatically placed in the appropriate location. The land cover GeoTIFF has been imported into Google Earth and is located in the Places panel.


In addition to importing GIS data into Google Earth Pro, you can also use many other tools and software programs to convert GIS data to KML files for use in Google Earth. GIS software, like QGIS, ESRI ArcGIS and MapInfo, have tools to export GIS data into KML format for use in Google Earth.
QGIS, the open source GIS software has several KML related tools and plugins.
ESRI ArcGIS contains tools in the ArcToolbox (Conversion Tools > To KML) for converting vector and raster GIS data to KML.
MapInfo Professional has a MapInfos Professional Google Earth Link Utility.
ogr2gui, a utility that converts many formats, including shapefiles to KML.
Discussion and Feedback
Have questions about this tutorial? Want to give us some feedback? Visit the Google Earth Help Community to discuss it with others.