
Related Manuals for Oregon Scientific RAR601


Summary of Contents for Oregon Scientific RAR601
- Page 1 Wireless Thermo Clock Model : RAR601 User Manual RAR601 lab test cover R2 1/8/04, 6:47 PM...
-
Page 2: Table Of Contents
CONTENTS Contents ... 1 Introduction ... 2 About Oregon Scientific ... 2 Product Overview ... 3 Front View ... 3 Back View ... 4 Remote Sensor ... 5 Getting Started ... 6 Batteries ... 6 Change Settings ... 6 Table Stand or Wall Mount ... 6 Remote Sensor ... -
Page 3: Introduction
INTRODUCTION Thank you for selecting the Oregon Scientific Thermo Clock (RAR601). This device bundles alarm clock and temperature monitoring features into a single tool you can use from the convenience of your home. In this box, you will find: • Main unit •... -
Page 4: Product Overview
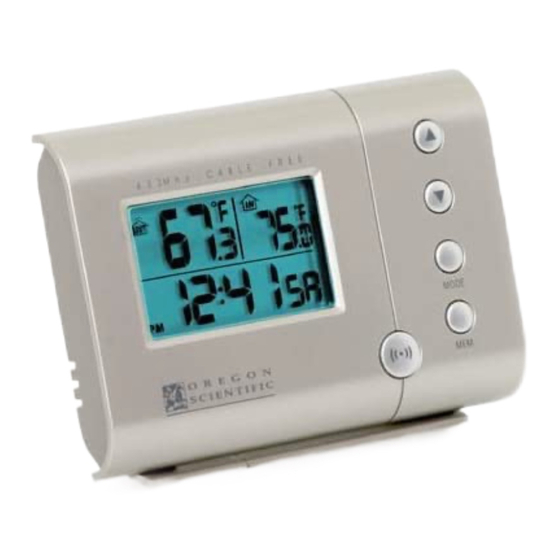
PRODUCT OVERVIEW FRONT VIEW RAR601 lab test R2 Outdoor Temperature Area : Readings, sensor battery and reception status Indoor Temperature Area : Readings and main unit battery status. Clock / Alarm Area : Time, day of week, month, date, alarm... -
Page 5: Back View
BACK VIEW RAR601 lab test R2 Wall mount Battery compartment °C / °F switch RESET hole Table stand 1/17/04, 4:47 PM... -
Page 6: Remote Sensor
REMOTE SENSOR LED Status indicator RAR601 lab test R2 Wall mount hole Battery compartment Battery compartment cover 1/17/04, 4:47 PM 2, 3... -
Page 7: Getting Started
UNIT LOCATION Main Indoor Temperature Area Remote Outdoor Temperature Area. RAR601 lab test R2 CHANGE SETTINGS Press and hold MODE for 2 seconds to enter setting mode. Press UP or DOWN to change settings. Press MODE to confirm. TABLE STAND OR WALL MOUNT Insert the stand on the back of the product, or mount it on a wall with a nail. -
Page 8: Setup Sensor
Close the remote sensor battery compartment. Secure the sensor in the desired location using the wall mount or table stand. RAR601 lab test R2 For best results: • Insert the batteries before you mount the sensor. • Place the sensor out of direct sunlight and moisture. -
Page 9: Search For Sensor
This is normal and does not affect general product performance. The reception will resume once the interference ends. RAR601 lab test R2 CLOCK This product has two displays: Clock with day of week in English, Spanish, French, Italian, or German, and Calendar display with date and month. -
Page 10: Alarm
Press ((.)) to confirm. ACTIVATE ALARM Press ((.)) to activate or deactivate the Alarm. in the Alarm Area when the Alarm is activated. RAR601 lab test R2 TEMPERATURE This product can display current, maximum, and minimum temperature readings collected by the main unit (indoor) and remote sensor (outdoor). -
Page 11: Reset System
Clean the product with a slightly damp cloth and alcohol- free mild detergent. Avoid dropping the product or placing it in a high-traffic location. RAR601 lab test R2 WARNINGS This product is designed to give you years of service if handled properly. -
Page 12: Troubleshooting
1.62 ounces with battery REMOTE SENSOR DIMENSIONS L x W x H 96 x 50 x 62 mm (3.8 x 2.0 x 2.4 inches) Weight 46 grams without battery RAR601 lab test R2 TEMPERATURE Unit Indoor Range Outdoor Range Resolution Memory... -
Page 13: Fcc Statement
RAR601 lab test R2 • Reorient or relocate the receiving antenna. • Increase the separation between the equipment and receiver. - Page 14 Phase 1, 41 Man Yue St., Hung Hom, Kowloon, Hong Kong RAR601 lab test R2 is in conformity with Part 15 of the FCC Rules. Operation is subject to the following two conditions: 1) This device may not cause harmful interference.
- Page 15 © 2004 Oregon Scientific. All rights reserved. P/N.: 086-003348-01 RAR601 lab test Back cover 12/29/03, 10:14 PM Black...